Update: A COMPLETE SUCCESS !
Before I jumped into the freezer/oven technique I also checked my cat can stopper and discovered if I shaved off about 1/8th inch then that would help the two cans to butt against each other at the center of the band.
I cut a few more bands and opened the ends of a few cans. I tossed cans into the freezer and the bands into the oven (at about 350 degrees F). Being impatient the cans were not inside either oven or freezer for more than a couple minutes. Hey, they are aluminum! They are suppose to conduct heat (or lose it) FAST !
I pulled out the band from the oven, then grabbed the can from the freezer and slid the can into the band with very little trouble. I would guess there is about a 10 second window before the metals acclimated enough toward room temperature to make significant movement difficult without the possibility of twisitng the can. I tossed the can/band combo into the oven, let them heat up and then pulled them out and grabbed another can from the freezer. Rinse and repeat BUT I did not rinse with water.
I attached 5 cans in series, bottom-to-bottom and top-to-top. Very tight fits, and with the 4 bands between 5 cans, there were only 2 "pin hole" size openings where the cans buckled inward. So the final product is almost watertight, definitely structurally much more sound, and the oven/freezer angle buys at least 5 to 10 seconds to get the cans joined very well. Success!
Tuesday, November 15, 2011
Monday, November 14, 2011
TIME TO IMPROVISE !
Here I'm now focusing on the issue of joining the cans in such a manner as to eliminate the problems of melting glue and mechanical connectors that would no doubt cause corrosion. So lets make the connections out of the same cans that were being used originally.
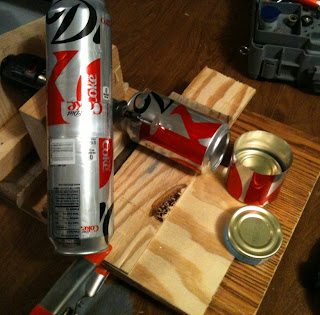
There is a lot of information in this picture so examine it carefully! In the center of the picture is the Dremel with the #409 cut-off wheel.The can that is laying on it's side is braced against a piece of wood (darker wood) behind, and another brace at the top of the can toward the Dremel. This way I can just pull the board and can toward me slightly and rotate the can while the cutter does it's job. Notice the band already cut to the right.
If you look at the two cans that have been joined by a band on the left side of the photo, the band is a bit narrower since it's joining two cans that are oriented bottom-to-bottom. If you look real close, you can actually see the impression from the cans beneath, about 1/4-inch inside the cuts. The attachment is much stronger than the glued versions, and will not be affected by the heat.
Referring to the band on the right again, notice the cans, one in the cut band, and one outside the band. I knew that if I were lucky enough to push the can into the band easily, then I needed something to stop the can from going beyond a halfway point. These are "Fancy Feast" cans (cat food) nicely cleaned by the kitties and then cut with the same #409 cut-off wheel. They "can" act as a stop.
Besides having a great connection, there are a few other observations to bring to light. I only put the can in the freezer and left the band at room temperature. Once both cans were in place, I saw that I have probably a 1/4-inch gap between the cans on the inside. They could have traveled another 1/8th inch each to butt-up against each other. So here's the next question. Would air flow over the gap be adversely affected enough to warrant more effort to get the cans against each other, or would the heat that will be generated on the band be extracted more efficiently with the gap?
Heat generated would no doubt transfer from the band and through the cans anyway, so I will try the following. Regardless of the plastic coating on the can, I will heat the band (or the band plus the already attached can) to 300 degrees F in my oven. The other can (or the first can) will go to the freezer. If the expansion of the heated band, and contraction of the can is more pronounced, I may easily get the extra 1/8th inch (down to the cat food can stopper).
What makes the aluminum can such a good conductor will work against me as the cold can will heat up fast, while the hot band will also contract pretty fast. Lets see what can be accomplished !
Saturday, November 12, 2011
MY FAN SYSTEM DOES NOT SUCK!!
I just had to use that line, since as I expected all along, the 1/2-inch PVC line from the collector was just too restrictive. The fan was just churning away inside the fan housing, but there was just not enough air flow to pull the heated air from the collector. No sense even hooking the circulation system to the collector since the air temp would easily top that 250 degree mark while the fan would be doing it's best to....suck....that air out.
So how did I get to that conclusion? Que more pictures!!!

The outlet is on the left, attached to the wood frame which is attached to the fan. Notice the attractive cover for the batteries? That prevents air from skirting beneath the expertly made intake housing shown on the right as well as having the heated air blowing directly onto the batteries on the way to the fan.
I realize anyone reading this will think the same as I did when looking at that small diameter PVC line. I believe I recited the phrase "Not a chance" on multiple occasions.

With the housing in place (but without showing the superb duct tape sealing work to further eliminate losses) the unit was complete. With no significant air losses, I could hold the unit up to my face and barely detect a current. All I had to do was pull the housing back a bit, thus allowing air to freely get to the fan intake side and there was more than enough current. SO, since this current configuration does NOT suck, I have to re-design the air circulation system so it WILL suck. Rest assured I had actually been working on this all along. More to come shortly.
Friday, November 11, 2011
Here is the beginning of my conversion of an LED "lantern" into a fan housing. The previous experiment was also in it's early stages. I determined the 15 LEDs could operate well for 8 hours off eight rechargeable AA batteries. This was enough information to warrant the sacrifice of this wooden creation to become the basis for the fan housing I needed for the solar collector.

The 8 batteries are just a temporary substitution for the 12 V DC solar power that would drive the fan. First we have to verify that this system will work regardless of the power source. Look closely and you can see the batteries are held in place by the remains of a Radio Shack, radio controlled car. After about 10 years I finally found a real good use for that! I also found a solar battery charger but that only put out 7 V DC. Notice the red wire at the left side of the bottom battery. By just looping that around the appropriate connection (in this case all 8 batteries in series) I can get the total voltage I needed. Nothing here is permanent!

In my effort to not spend a bunch of cash, I looked for a fitting to expand from the measly 1/2-inch diameter PVC pipe entering the fan, and reducing to about the 2-inch "exhaust" end of the housing. For $1.88 I got the necessary fitting for the exhaust end. A funnel for pouring oil into your vehicle.

Sadly, the McDonald's cup really would not withstand the heat, but it's readily available at my place, and is a perfect size. Perhaps I'll hit a dollar store and find some cups that can be slightly modified. Regardless, you can see in this picture above the ridges have been ground off the funnel and it has been suitably ground to size. The open space between the wood frame and the indentations of what is left of the funnel, were blocked with duct tape. What else! I have yet to build the "housing" to attempt to keep this fine preliminary experiment from leaking like a sieve. More to come.
Friday, November 4, 2011

I heard there were fans in my computer so, I tore it apart! Actually I found this semi-dinosaur stored away and did my due dill-(pickle)-igence to scavenge the 3.5 floppy drive and hey...anyone need the three 256 MG ram memory chips?

The larger fan is from the power supply at about 3.5-inches and is 12 V DC at 0.2 amp. The smaller fan is about 2 inches and is 12 V DC and who knows what amperage. I suspect this was the easy part. Building the small fan housing and finding some loose solar cells floating around in my garage may be a bit more of a challenge. I think I'll make the fan housing a small replica of my house. Yeah. A bit of paint, a few fake windows. You know presentation is half the battle.
Just a quick observation concerning the duct tape. I was concerned that the visual distortion through the glass and the gooey paint only made the duct tape look to have melted but on closer examination (I removed the jar) it did indeed melt and separate. A good friend indicated his father's system, after some long service, failed at glued components due to heat. So that portion of the project will need additional attention.
Wednesday, November 2, 2011
Here is a a bit of "hands-on" high-tech methodology used to prepare the pop cans. I stick with one type in order to insure uniformity and join the cans bottom to bottom and top to top.
Hands-on because I grind the bottom of the can off by holding the can down against sandpaper on a table top, and sand it with a twisting motion. I try to avoid sliding the can because that could lead to uneven abrasion. Granted, after a few cans, I sensed my perfectionist attitudes were being ground away as well. Wear a heavy leather glove if you plan to grind more that a couple cans.

The can on the right shows the results of the bottom being sanded away. I start with 60 grit, then 100 and a final smoothing with a 220 grit. If you wash the cans out, the remaining water will seep out as you get close to finishing and muck up your sandpaper, so before sanding, toss a piece of paper towel into the can and wipe it around with a screw driver. Like trying to not bite into a tootsie-pop, you'll probably not sand until the bottom drops off. Instead you will notice the beginnings of the separation and with a thumb nail, just complete the task. I give an extra couple swipes with the 220 grit to eliminate any burrs that remain.
The top is cut out using a Dremel. I made a wood stand for the Dremel so I could hold the can with two hands. That makes the job much easier.
 I set the cans against something to help them stay aligned and used the block on the right to help keep them together. Obviously the contact is quite good throughout. After smearing the adhesive around the joint, it sets pretty fast and can be stood on end to dry.
The picture above was similar to the cans I used in my collector but because the two cans were about 1/16-inch too long to fit in the jar, I cut off one end (hot air intake side) just below the seam. Then I painted the cans with some old flat black oil based heat-resistant paint that I found on a shelf...hiding. I suspect I'll get a fresh can of the spray variety when repairing my "melted" components as the paint was still tacky after 15 hours and was not very "flat".
When installing the cans, I had a momentary lapse of judgement and had to unbolt and remove them from the, jar lid, which was already attached to the base. During the removal process I saw just how weak in tension this adhesive was and the cans pulled apart. I stuck them together and with it's tackiness, almost seemed adequate. But for good measure I added duct tape! One of the universal corrective materials that should always be on hand.
I indicate that this component "melted". The duct tape did have issues with being subjected to 250-degree F plus temperatures. I know just grabbing the thermometer that was measuring the internal temperatures that if I were in there, I would also have melted.
My next project will most likely use six rows of 7 cans each, and be roughly 3-feet-long, so this technique for cutting the cans will be used extensively. I will have to discover a better, heat resistant adhesive and devise a more structural means of support for that system. I simply hate when my cans droop and fall apart.
Hands-on because I grind the bottom of the can off by holding the can down against sandpaper on a table top, and sand it with a twisting motion. I try to avoid sliding the can because that could lead to uneven abrasion. Granted, after a few cans, I sensed my perfectionist attitudes were being ground away as well. Wear a heavy leather glove if you plan to grind more that a couple cans.

The can on the right shows the results of the bottom being sanded away. I start with 60 grit, then 100 and a final smoothing with a 220 grit. If you wash the cans out, the remaining water will seep out as you get close to finishing and muck up your sandpaper, so before sanding, toss a piece of paper towel into the can and wipe it around with a screw driver. Like trying to not bite into a tootsie-pop, you'll probably not sand until the bottom drops off. Instead you will notice the beginnings of the separation and with a thumb nail, just complete the task. I give an extra couple swipes with the 220 grit to eliminate any burrs that remain.
The top is cut out using a Dremel. I made a wood stand for the Dremel so I could hold the can with two hands. That makes the job much easier.

The picture above was similar to the cans I used in my collector but because the two cans were about 1/16-inch too long to fit in the jar, I cut off one end (hot air intake side) just below the seam. Then I painted the cans with some old flat black oil based heat-resistant paint that I found on a shelf...hiding. I suspect I'll get a fresh can of the spray variety when repairing my "melted" components as the paint was still tacky after 15 hours and was not very "flat".
When installing the cans, I had a momentary lapse of judgement and had to unbolt and remove them from the, jar lid, which was already attached to the base. During the removal process I saw just how weak in tension this adhesive was and the cans pulled apart. I stuck them together and with it's tackiness, almost seemed adequate. But for good measure I added duct tape! One of the universal corrective materials that should always be on hand.
I indicate that this component "melted". The duct tape did have issues with being subjected to 250-degree F plus temperatures. I know just grabbing the thermometer that was measuring the internal temperatures that if I were in there, I would also have melted.
My next project will most likely use six rows of 7 cans each, and be roughly 3-feet-long, so this technique for cutting the cans will be used extensively. I will have to discover a better, heat resistant adhesive and devise a more structural means of support for that system. I simply hate when my cans droop and fall apart.
As an introduction to my active solar collector....mobile heater unit... I shall start with a picture of where I am as of today.

My intent is to create some device that will obviously collect heat yet is portable, and is made from some pretty low-tech materials. In this case plywood, paint and glue, simple mirrors from a big box store (cost for six 12" x 12" mirrors being $10). The collector was to be a one gallon glass jug but then was changed to this BIG PICKLE jar. The black components are two painted pop cans. Although recycling glass may be a good thing, I was wondering how something already created could be further used in its original condition. No recycling needed.
This system, at this stage in development, is a success. The outside temperature at 10:15 am EST (note thermometer sticking up above the unit) was approximately 60 degrees F. This unit does not yet have the fan assembly attached but I had to test this regardless! Within less than 5 minutes, the thermometer reading the inside temperature was over 250 degrees F. Since the interior was melting away due to some other issues, and my thermometers really only were marked to 230 degrees F, I figured enough fun for the day and shut down the test.
I'll admit that now I'm already designing the next version which will be substantially less complicated. As such, you can notice one of the 12 mirrors was never installed. I ran out of mirrors and could not bring myself to attempt to cut yet one more odd-shaped mirror. Between hand cutting and using a tile saw, this was one task best avoided.
Notice the wood dowel at the top right corner of the base. That is the Collector to Solar Radiation Orientation Device (CSROD). No shadow cast by the CSROD means the device is in it's optimum position. Took me about 5 seconds to set the collector correctly and lock it in place. You can bet my next version will have a CSROD installed!
I shall post the construction aspects of this system in some following posts.
Morgan Solar Collector
I'm stepping into the Blogosphere in order to better show the progress related to my active solar heating endeavors. Now friends and family will be able to avoid the unsolicited picture attachments to e-mails, clogging up the Internet arteries with massive quantities of pixels.
This will be a work-in-progress just as my work on the solar collector has been. Be kind. Be patient.
This will be a work-in-progress just as my work on the solar collector has been. Be kind. Be patient.
Subscribe to:
Posts (Atom)